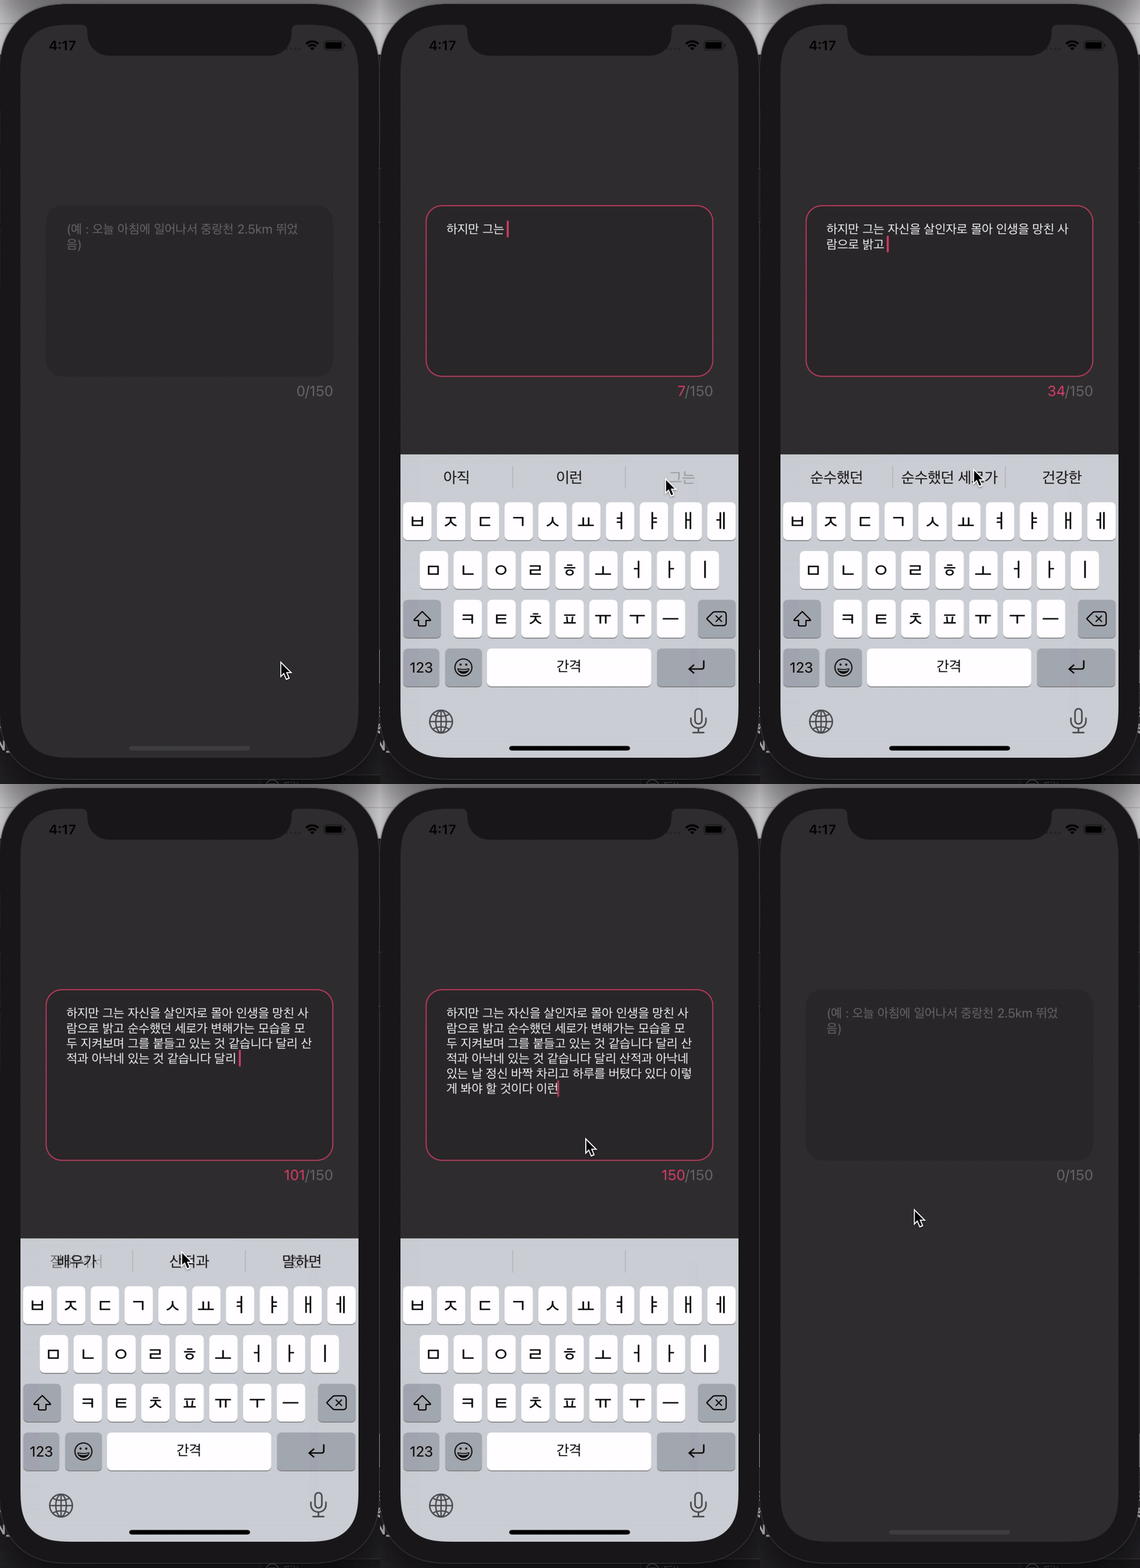
📦 TextView - 플레이스홀더, 패딩, 글자 수 제한, 커서 색상, 키보드 dismiss
프로젝트를 하면서 TextView를 사용해 다양한 기능을 구현하게 되어 정리를 해봅니다!
SnapKit과 Then 라이브러리를 사용하였습니다!
<전체 코드는 아래 있고,
색상은 프로젝트하면서 extension으로 추가해준 색상을 사용해서 따로 네이밍된 상태입니다.>
Github - https://github.com/heerucan/iOS-Practice/tree/main/TextView%20Practice
우선, textView를 사용하려면 UITextViewDelegate 프로토콜을 해당 뷰컨에 채택해주고 위임처리를 해주어야 합니다.
1. Placeholder
-> TextView는 TextField와 다르게 기본적으로 placeholder를 제공해주지 않기 때문에
textView.text를 통해 placeholder인 척 기능을 구현해봤습니다.
1️⃣ 텍스트뷰를 수정하기 시작할 때 (textViewDidBeginEditing)
유저가 텍스트를 입력하기 시작하면 글자색이 흰색으로 변경되어야 합니다.
2️⃣ 텍스트뷰 수정을 끝냈을 때 == 키보드를 내릴 때 (textViewDidEndEditing)
만약, 수정을 끝낼 때에 유저가 아무 것도 입력하지 않았을 때는 placeholder를 보여줘야 합니다.또한, 입력이 완료된 상태는 keyboard가 내려간 상태와 같다고 인지할 수 있도록 VC 내에 touchesBegan 함수를 오버라이드 해주었습니다.
    override func touchesBegan(_ touches: Set<UITouch>, with event: UIEvent?) {
        self.view.endEditing(true) /// 화면을 누르면 키보드 내려가게 하는 것
    }
* 한 가지 걱정되는 부분은 만약 유저가 placeholder로 지정해 놓은 글자와 똑같이 textView에 입력할 경우에는 어쩌나...라는... 생각이 들었고.. 애플이 얼른 하루 빨리 textView에도 placeholder 기능을 내주길 바라며....;;;
let placeholder = "(예 : 오늘 아침에 일어나서 중랑천 2.5km 뛰었음)"extension ViewController: UITextViewDelegate {
func textViewDidBeginEditing(_ textView: UITextView) {
/// 플레이스홀더
if textView.text.isEmpty {
activityTextView.textColor = .gray200
activityTextView.text = placeholder
} else if textView.text == placeholder {
activityTextView.textColor = .white
activityTextView.text = nil
}
}
func textViewDidEndEditing(_ textView: UITextView) {
/// 플레이스홀더
if textView.text.isEmpty {
activityTextView.textColor = .gray200
activityTextView.text = placeholder
}
}
}
‼️‼️
-> 여기서 하나 주의할 점은 만약 유저가 띄어쓰기를 입력할 경우입니다!
공백 또는 줄바꿈을 입력할 경우에도 placeholder를 적용시키려면 문자열의 앞뒤 공백과 줄바꿈을 제거해주는
trimmingCharacters(in: .whitespacesAndNewlines)를 통해 가능합니다.
extension AddActionVC: UITextViewDelegate {
    func textViewDidBeginEditing(_ textView: UITextView) {
        /// 플레이스 홀더
        if textView.text == placholder {
            textView.text = nil
            textView.textColor = .white
        } else if textView.text.trimmingCharacters(in: .whitespacesAndNewlines).isEmpty {
            textView.text = placholder
            textView.textColor = .gray200
        }
    }

    func textViewDidEndEditing(_ textView: UITextView) {
        if textView.text.trimmingCharacters(in: .whitespacesAndNewlines).isEmpty {
            textView.text = placholder
            textView.textColor = .gray200
        }
    }
}
2. 패딩
-> textView 내에서 커서를 입력하면 왼쪽 패딩 값이 없는 걸 볼 수 있는데
패딩 값을 주려면 textContainerInset를 사용해서 textView 내부의 상하좌우 inset 값을 설정해 줄 수 있습니다.
let activityTextView = UITextView().then {
    $0.textContainerInset = UIEdgeInsets(top: 18, left: 18, bottom: 18, right: 18)
}
3. 글자 수 제한
-> UITextViewDelegate 안 textViewDidChange 함수 안에 텍스트뷰의 텍스트 개수가 150자를 넘어갈 경우
deleteBackward()를 통해서 커서 바로 전 문자를 삭제하도록 해줍니다!
func textViewDidChange(_ textView: UITextView) {
    if activityTextView.text.count > 150 {
       activityTextView.deleteBackward()
    }
}
‼️‼️
-> 좀 더 심화로,,,
현재 몇 글자를 작성했는지 표시해주는 ui를 구현해 보았습니다!
activityTextView.text.count를 통해 현재 텍스트뷰의 텍스트 개수를 label.text로 바로 반영해줬습니다.
NSMutableAttributedString 을 통해서 문자열의 특정 부분의 색상을 변경시켜줬습니다.
    func textViewDidChange(_ textView: UITextView) {
        /// 글자 수 제한
        if activityTextView.text.count > 150 {
            activityTextView.deleteBackward()
        }

        /// 아래 글자 수 표시되게 하기
        letterNumLabel.text = "\(activityTextView.text.count)/150"

        /// 글자 수 부분 색상 변경
        let attributedString = NSMutableAttributedString(string: "\(activityTextView.text.count)/150")
        attributedString.addAttribute(.foregroundColor, value: UIColor.pink100, range: ("\(activityTextView.text.count)/150" as NSString).range(of:"\(activityTextView.text.count)"))
        letterNumLabel.attributedText = attributedString
    }
‼️‼️
그리고 공백이나 줄바꿈을 입력할 때 글자 수 표시를 " 0/150 "으로 표시해주기 위해서는
textView.text가 공백일 경우에 해당 조건을 넣어주면 됩니다.
    func textViewDidEndEditing(_ textView: UITextView) {
        /// 텍스트뷰 입력 완료시 테두리 없애기
        activityTextView.layer.borderWidth = 0

        /// 플레이스홀더
        if textView.text.trimmingCharacters(in: .whitespacesAndNewlines).isEmpty || textView.text == placeholder {
            activityTextView.textColor = .gray200
            activityTextView.text = placeholder
            letterNumLabel.textColor = .gray200 /// 텍스트 개수가 0일 경우에는 글자 수 표시 색상이 모두 gray 색이게 설정
            letterNumLabel.text = "0/150"
        }
    }
4. 커서 색깔
-> tintColor를 설정해주면 됩니다
let activityTextView = UITextView().then {
    $0.tintColor = .pink100
}
구 현 영 상 ~

전 체 코 드 ~
//
//  ViewController.swift
//  TextView Practice
//
//  Created by Thisisme Hi on 2021/07/20.
//

import UIKit

import Then
import SnapKit

class ViewController: UIViewController {
    // MARK: - Properties
    let placeholder = "(예 : 오늘 아침에 일어나서 중랑천 2.5km 뛰었음)"

    let activityTextView = UITextView().then {
        $0.font = .systemFont(ofSize: 14)
        $0.layer.cornerRadius = 18
        $0.backgroundColor = .black200
        $0.tintColor = .pink100
        $0.textContainerInset = UIEdgeInsets(top: 18, left: 18, bottom: 18, right: 18)
    }

    let letterNumLabel = UILabel().then {
        $0.text = "0/150"
        $0.font = .systemFont(ofSize: 16)
        $0.textColor = .gray200
        $0.textAlignment = .right
    }

    // MARK: - Lifecycle
    override func viewDidLoad() {
        super.viewDidLoad()
        configUI()
        setupAutoLayout()
        setupTextView()
    }

    // MARK: - Custom Method
    func configUI() {
        view.backgroundColor = .black
    }

    func setupAutoLayout() {
        view.addSubview(activityTextView)
        view.addSubview(letterNumLabel)

        activityTextView.snp.makeConstraints { make in
            make.top.equalTo(200)
            make.centerX.equalToSuperview()
            make.height.equalTo(190)
            make.width.equalTo(319)
        }

        letterNumLabel.snp.makeConstraints { make in
            make.top.equalTo(activityTextView.snp.bottom).offset(6)
            make.trailing.equalToSuperview().inset(28)
        }
    }

    func setupTextView() {
        activityTextView.delegate = self
        activityTextView.text = placeholder /// 초반 placeholder 생성
        activityTextView.textColor = .gray200 /// 초반 placeholder 색상 설정
    }

    override func touchesBegan(_ touches: Set<UITouch>, with event: UIEvent?) {
        self.view.endEditing(true) /// 화면을 누르면 키보드 내려가게 하는 것
    }
}

extension ViewController: UITextViewDelegate {
    func textViewDidBeginEditing(_ textView: UITextView) {
        /// 텍스트뷰 입력 시 테두리 생기게 하기
        activityTextView.layer.borderWidth = 1
        activityTextView.layer.borderColor = UIColor.pink100.cgColor

        /// 플레이스홀더
        if textView.text.trimmingCharacters(in: .whitespacesAndNewlines).isEmpty {
            activityTextView.textColor = .gray200
            activityTextView.text = placeholder
        } else if textView.text == placeholder {
            activityTextView.textColor = .white
            activityTextView.text = nil
        }
    }

    func textViewDidChange(_ textView: UITextView) {
        /// 글자 수 제한
        if activityTextView.text.count > 150 {
            activityTextView.deleteBackward()
        }

        /// 아래 글자 수 표시되게 하기
        letterNumLabel.text = "\(activityTextView.text.count)/150"

        /// 글자 수 부분 색상 변경
        let attributedString = NSMutableAttributedString(string: "\(activityTextView.text.count)/150")
        attributedString.addAttribute(.foregroundColor, value: UIColor.pink100, range: ("\(activityTextView.text.count)/150" as NSString).range(of:"\(activityTextView.text.count)"))
        letterNumLabel.attributedText = attributedString
    }

    func textViewDidEndEditing(_ textView: UITextView) {
        /// 텍스트뷰 입력 완료시 테두리 없애기
        activityTextView.layer.borderWidth = 0

        /// 플레이스홀더
        if textView.text.trimmingCharacters(in: .whitespacesAndNewlines).isEmpty || textView.text == placeholder {
            activityTextView.textColor = .gray200
            activityTextView.text = placeholder
            letterNumLabel.textColor = .gray200 /// 텍스트 개수가 0일 경우에는 글자 수 표시 색상이 모두 gray 색이게 설정
            letterNumLabel.text = "0/150"
        }
    }
}
'⭐️ 개발 > iOS & Swift' 카테고리의 다른 글
| [iOS] NotificationCenter? (0) | 2021.07.29 |
|---|---|
| [iOS] Moya가 모야? - Moya로 Get 통신하기 (10) | 2021.07.25 |
| [iOS] Alamofire Multipart/formdata를 통한 이미지 서버 통신 (3) | 2021.07.19 |
| [iOS] DateFormatter (2) | 2021.06.24 |
| [iOS] Expandable TableView Cell 만들기 (6) | 2021.06.16 |
![[iOS] TextView - 플레이스홀더, 패딩, 글자 수 제한, 커서, 키보드 dismiss](https://img1.daumcdn.net/thumb/R750x0/?scode=mtistory2&fname=https%3A%2F%2Fblog.kakaocdn.net%2Fdna%2FlOgcz%2FbtraeyTOKYF%2FAAAAAAAAAAAAAAAAAAAAANci79gdWeN7_DaNnd_P83Bl1UUrwYSYakYg-ut-ZNc-%2Fimg.gif%3Fcredential%3DyqXZFxpELC7KVnFOS48ylbz2pIh7yKj8%26expires%3D1769871599%26allow_ip%3D%26allow_referer%3D%26signature%3DcWjLQymY9n3k20Ujl7UAHrZTepA%253D)